How to Create VM Instances | VM Provisioning Guide
This guide walks you through provisioning a new virtual machine instance on your configured cloud provider.
Prerequisites
Before provisioning a VM, ensure you have:
- Cloud Accounts Configured: At least one cloud provider account (AWS, GCP, or Azure) added to Nife with valid credentials
- Active Organization: An organization created in your Nife account
- Access to Virtual Machines: Permission to access the Virtual Machines section
Step 1: Access VM Provisioning
- Navigate to Virtual Machines in the left sidebar
- Click on the Manage Instances tab
- Click the Provision VM button in the top-right corner
- The VM provisioning form will open
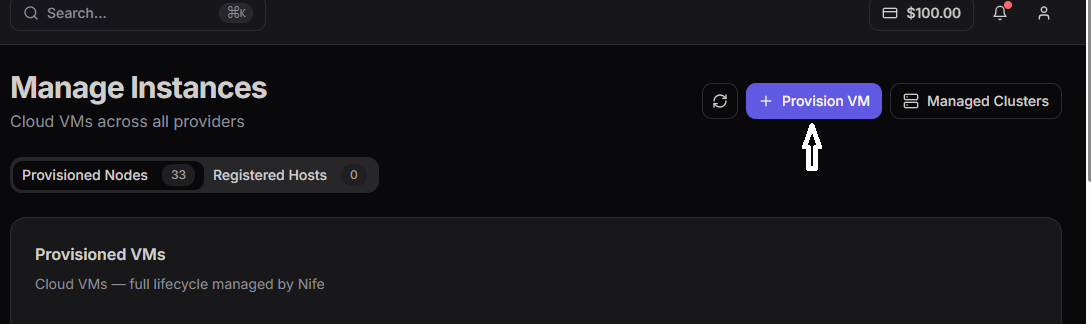 VM Management page - Manage Instances tab with Provision VM button
Step 2: Select Cloud Account
At the top of the provisioning form, select which cloud account to use for provisioning.
Cloud Account Selection:
- Click the cloud account dropdown
- Select from your configured accounts
- Shows provider (AWS, GCP, Azure) and account name
- Example: "AWS - test-aws-account"
- Default region is displayed below the selection
Example Display:
AWS  test-aws-account
Default region: ap-south-1
Step 3: Node Configuration
After selecting your cloud account, fill in the Node Configuration details that determine your VM's specifications and deployment mode.
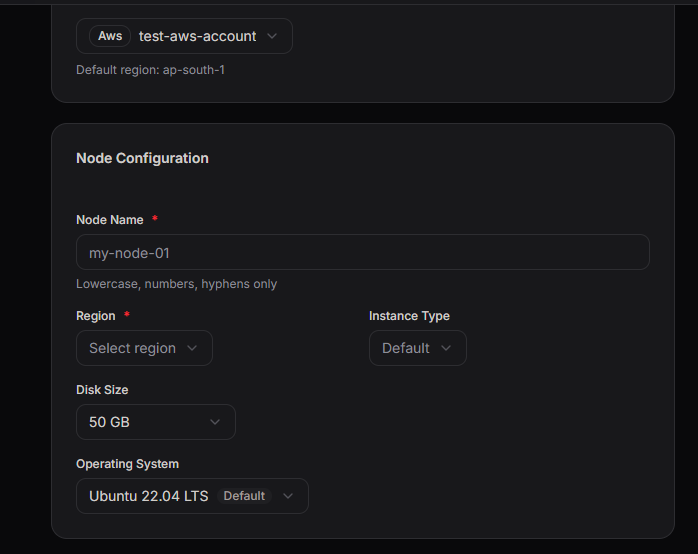 Node Configuration form showing all VM specification fields
Node Name
Enter a unique name for your VM instance.
Requirements:
- Lowercase letters, numbers, and hyphens only
- No uppercase letters or special characters
- No spaces allowed
- Example:
my-node-01,app-server-prod,web-01
Validation Message: "Lowercase, numbers, hyphens only"
Region
Select the region/zone where your VM will be deployed.
How to Use:
- Click the Region dropdown
- Select from available regions/zones for your cloud provider
- Must be a valid region in your selected cloud account
AWS Regions (Examples):
- ap-south-1 (Mumbai)
- us-east-1 (Virginia)
- eu-west-1 (Ireland)
- ap-southeast-1 (Singapore)
GCP Zones (Examples):
- us-central1-a
- europe-west1-b
- asia-southeast1-c
Azure Regions (Examples):
- East US
- West Europe
- Southeast Asia
Instance Type
Select the VM instance size/type based on your workload requirements.
Common Instance Types:
AWS:
- t3.micro - 1 vCPU, 1 GB RAM (free tier eligible)
- t3.small - 2 vCPU, 2 GB RAM
- t3.medium - 2 vCPU, 4 GB RAM
- m5.large - 2 vCPU, 8 GB RAM
- m5.xlarge - 4 vCPU, 16 GB RAM
GCP:
- e2-micro - 0.25-2 vCPU, 1 GB RAM (free tier)
- e2-small - 0.5-2 vCPU, 2 GB RAM
- e2-medium - 1-2 vCPU, 4 GB RAM
- n1-standard-2 - 2 vCPU, 7.5 GB RAM
- n1-standard-4 - 4 vCPU, 15 GB RAM
Azure:
- Standard_B1s - 1 vCPU, 1 GB RAM
- Standard_B2s - 2 vCPU, 4 GB RAM
- Standard_D2s_v3 - 2 vCPU, 8 GB RAM
- Standard_D4s_v3 - 4 vCPU, 16 GB RAM
Selection Tips:
- Start with smaller instance types for testing
- Scale up based on workload requirements
- Consider CPU, memory, and network needs
- Check pricing for your region
Disk Size
Select the storage capacity for your VM's primary disk.
Common Disk Sizes:
- 20 GB - Small applications, testing
- 30 GB - Standard web applications
- 50 GB - Database servers, media storage
- 100 GB - High-volume data, development
- 200 GB+ - Large datasets, enterprise workloads
How to Select:
- Click the Disk Size dropdown
- Choose appropriate size
- Consider growth and scaling needs
- Check cloud provider storage pricing
Disk can often be expanded after provisioning, but starting with adequate size is recommended.
Operating System
Select the OS for your VM instance.
Available Operating Systems:
-
Ubuntu 22.04 LTS (Recommended - Default)
- Latest stable Ubuntu long-term support
- Wide software compatibility
- Nife agent pre-installed support
-
Ubuntu 20.04 LTS
- Previous LTS version
- Stable and widely used
-
Amazon Linux 2
- AWS-optimized Linux
- Good for AWS workloads
-
CentOS 7
- Enterprise Linux
- Red Hat compatible
-
Debian 11
- Lightweight, stable
- Large package repository
Recommendation:
- Use Ubuntu 22.04 LTS for best compatibility with Nife
- Default selection is suitable for most use cases
Step 4: Select Node Mode
After Node Configuration, you'll select the deployment mode for your VM.
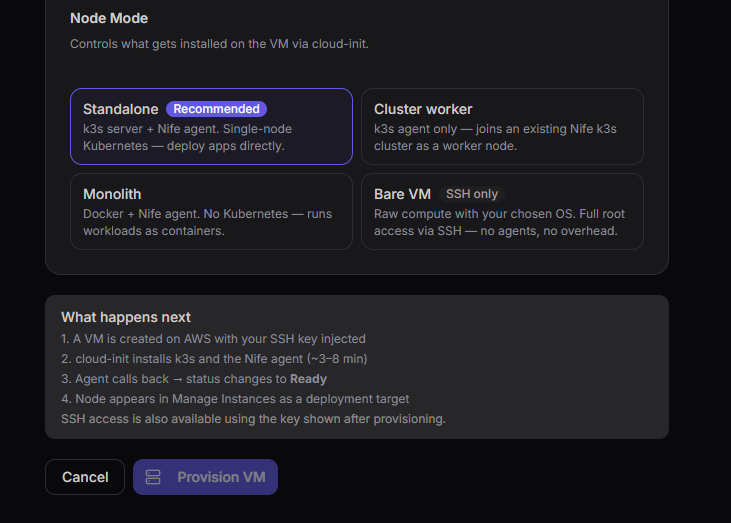 Node Mode selection showing Standalone, Cluster Worker, Monolith, and Bare VM options
Node Mode Options
Standalone (Recommended)
Best for: Kubernetes deployments, single-node clusters, applications
- K3s server (lightweight Kubernetes) deployed automatically
- VM agent installed for monitoring
- Full Kubernetes capabilities
- Deploy containerized applications
- Single command control plane
Installation: K3s + VM agent (3-8 minutes)
Cluster Worker
Best for: Scaling existing Kubernetes clusters
- K3s worker deployed to join existing cluster
- Extends cluster capacity
- Works with Standalone node as control plane
- Automatic cluster registration
Installation: K3s worker node
Monolith
Best for: Docker-based workloads without Kubernetes
- Docker runtime deployed
- Monolith agent for container management
- Simpler than Kubernetes
- Direct Docker container deployment
- No Kubernetes overhead
Installation: Docker + Monolith agent (3-8 minutes)
Bare VM
Best for: Custom applications, SSH-only access
- SSH access only
- No agents installed
- Full OS control
- Maximum flexibility
- Raw compute power
Installation: None (OS only)
Step 5: Review and Provision
Before creating your VM, review all settings:
Verification Checklist:
- Cloud Account selected
- Node Name is valid (lowercase, numbers, hyphens)
- Region is appropriate for your use case
- Instance Type has adequate resources
- Disk Size is sufficient
- Operating System selected
- Node Mode matches your needs
Provision the VM:
- Click the Provision VM button
- Confirmation message appears
- Provisioning process begins
- Status page opens showing provisioning progress
Step 6: VM Provisioning Status
After clicking Provision VM, you'll see a status page monitoring the creation process. The workflow shown depends on which Node Mode you selected.
General Provisioning Stages
All Node Modes follow these general stages:
Stage 1: Provisioning VM (1-2 minutes)
Initial creation phase where the VM is being created on your cloud provider.
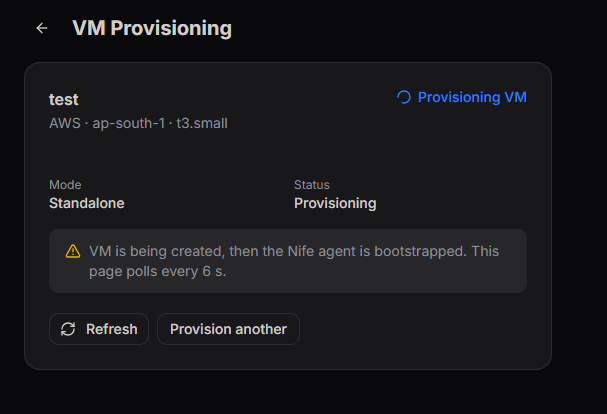 VM being created on cloud provider
What's Happening:
- VM is being launched on your cloud provider
- SSH key is being injected
- Cloud resources are being allocated
- Page auto-refreshes every 6 seconds
Information Shown:
- Instance Name
- Cloud Provider & Region
- Node Mode
- Status: Provisioning
Stage 2: Bootstrapping Agent (3-8 minutes)
Agent and runtime installation phase.
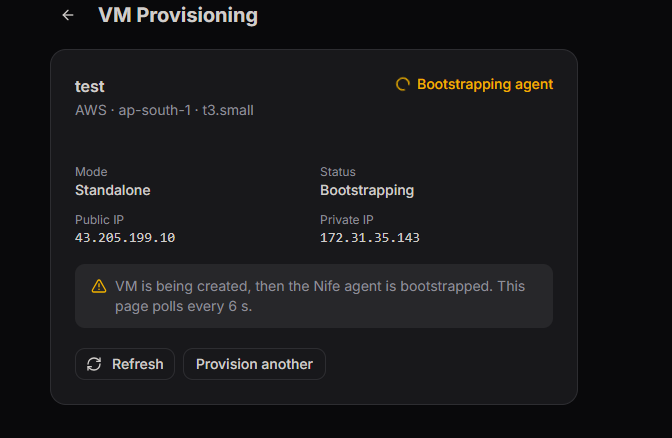 Agent and services being installed
What's Happening:
- VM is running on cloud provider
- Cloud-init executing on instance
- Agent installation in progress
- K3s or Docker being configured
Information Shown:
- Instance Name
- Cloud Provider & Region
- Node Mode
- Status: Bootstrapping (orange)
- Public IP address
- Private IP address
Standalone Mode - Detailed Provisioning Workflow
When you select Standalone mode, the provisioning includes K3s (lightweight Kubernetes) and VM agent installation for Kubernetes workloads.
Standalone Stage 3: Ready - Kubernetes Cluster Setup
Provisioning complete and K3s cluster is operational.
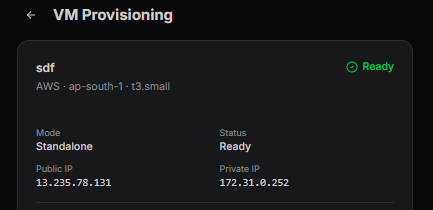 Standalone mode - Ready status showing mode, IP addresses, and ready indicator
Status: Ready (green checkmark)
What is Completed:
- VM fully created and running
- K3s Kubernetes server installed and operational
- VM agent installed, running, connected to Nife
- Kubernetes networking configured
- Cluster ready for workload deployment
Information Shown:
- Instance Name (e.g., sdf)
- Cloud Provider and Region (e.g., AWS - ap-south-1 - t3.small)
- Node Mode: Standalone
- Status: Ready (green)
- Public IP Address (e.g., 13.235.78.131)
- Private IP Address (e.g., 172.31.8.252)
Standalone Ready Page - SSH Access
The Ready page displays SSH connection instructions for accessing your Standalone instance.
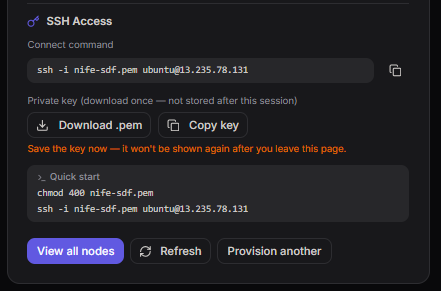 SSH Access section showing connect command and key management options
SSH Access Section:
Connect Command:
ssh -i nife-sdf.pem ubuntu@13.235.78.131
Key Management:
- Download .pem: Download private key (shown only once)
- Copy key: Copy key to clipboard
- Warning: Save the key now - it won't be shown again after leaving this page
Quick Start:
- Copy and run the SSH command in your terminal
- Use the downloaded or copied private key
- Default user: ubuntu
- SSH port: 22
Standalone Ready Page - K3s Cluster Setup
The Ready page also displays instructions to connect your K3s cluster to Nife.
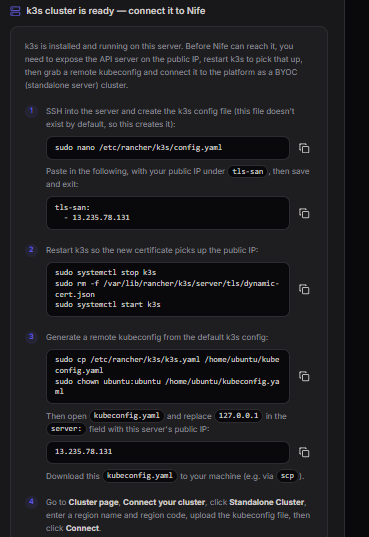 K3s cluster setup showing configuration steps and cluster connection
K3s Setup Steps:
Step 1: SSH into the server and create the k3s config file:
sudo nano /etc/rancher/k3s/config.yaml
Paste in the following, with your public IP under tls-san:
tls-san:
  - 13.235.78.131
Step 2: Restart k3s so the new certificate picks up the public IP:
sudo systemctl stop k3s
sudo rm -f /var/lib/rancher/k3s/server/tls/dynamic-listeners.json
sudo systemctl start k3s
Step 3: Generate a remote kubeconfig from the default k3s config:
sudo cat /etc/rancher/k3s/k3s.yaml > /home/ubuntu/kubeconfig.yaml
Then edit kubeconfig.yaml and replace 127.0.0.1 with your server public IP:
Replace 127.0.0.1 with your server's public IP: 13.235.78.131
Download this kubeconfig.yaml to your machine via scp:
scp -i nife-sdf.pem ubuntu@13.235.78.131:/home/ubuntu/kubeconfig.yaml ./kubeconfig.yaml
Standalone Cluster Connection
After following the k3s setup steps:
- Download the kubeconfig.yaml file to your local machine
- Set your KUBECONFIG environment variable:
export KUBECONFIG=/path/to/kubeconfig.yaml
- Verify kubectl connectivity:
kubectl get nodeskubectl get pods -A
- Cluster is ready for Kubernetes workload deployment
- Use kubectl to deploy applications
- Deploy Helm charts if needed
- Nife VM agent monitors cluster health
Standalone Server Ready For
- Kubernetes workload deployment
- Helm chart installation
- kubectl command line management
- Persistent volume provisioning
- Multi-container pod deployment
- Network policy configuration
- Ingress controller setup
- Monitoring and logging integration
Standalone Mode - Best Practices
- Save the Private Key: Download and secure the SSH key immediately
- Backup kubeconfig.yaml: Store in secure location
- Update TLS Certificates: Include public IP in tls-san
- Network Access: Restrict SSH (port 22) to trusted IPs
- Kubernetes Security: Use RBAC for pod/service access
- Storage: Configure persistent volumes for stateful apps
- Monitoring: Enable Nife monitoring for cluster health
- Resource Limits: Set pod resource requests and limits
Monolith Mode - Detailed Provisioning Workflow
When you select Monolith mode, the provisioning includes Docker runtime and Monolith agent installation for container workloads.
Monolith Stage 1: Provisioning VM
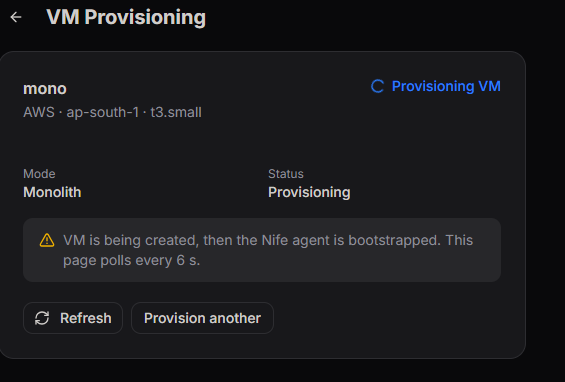 Monolith mode - VM creation in progress
Status: Provisioning
- VM is being created on your cloud provider
- SSH key is being injected
- Cloud resources allocation starting
- Instance type and disk being configured
- Page auto-refreshes every 6 seconds
Information Shown:
- Instance Name (e.g.,
mono) - Cloud Provider & Region (e.g.,
AWS - ap-south-1 - t3.small) - Node Mode: Monolith
- Status: Provisioning
Monolith Stage 2: Bootstrapping Agent
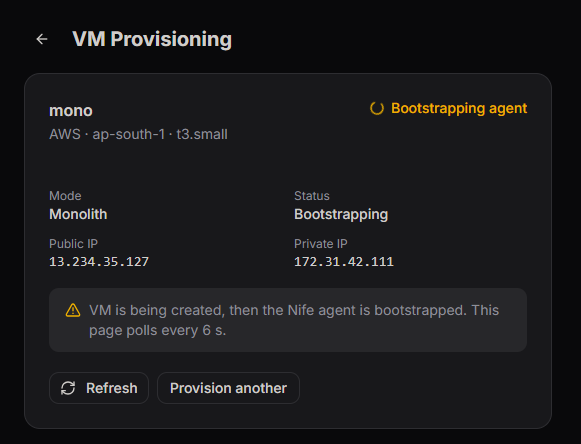 Monolith mode - Docker and agent installation
Status: Bootstrapping (orange indicator)
What's Installing:
- Docker runtime environment
- Monolith agent for container management
- Container networking and storage
- Total time: 3-8 minutes
Information Shown:
- Instance Name (e.g.,
mono) - Cloud Provider & Region (e.g.,
AWS - ap-south-1 - t3.small) - Node Mode: Monolith
- Status: Bootstrapping
- Public IP Address (e.g.,
13.234.35.127) - Private IP Address (e.g.,
172.31.42.111)
Monolith Stage 3: Ready - Container Server Setup
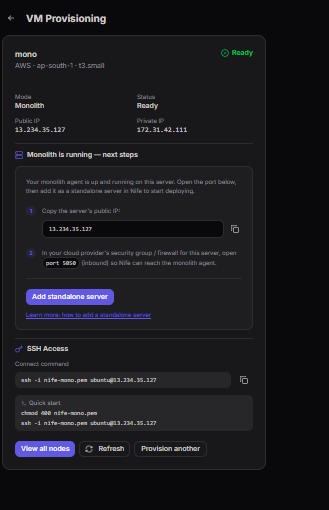 Monolith mode - Ready with container setup instructions
Status: Ready (green checkmark)
What's Completed:
- VM fully created and running
- Docker runtime installed and operational
- Monolith agent installed, running, connected to Nife
- Container networking configured
- Server ready for Docker container deployment
Information Shown:
- Instance Name (e.g.,
mono) - Cloud Provider & Region (e.g.,
AWS - ap-south-1 - t3.small) - Node Mode: Monolith
- Status: Ready (green)
- Public IP Address (e.g.,
13.234.35.127) - Private IP Address (e.g.,
172.31.42.111)
On-Screen Instructions (visible on Ready page):
- "Monolith is running - next steps"
- Copy server's public IP
- Configure security group/firewall for port 5004
- Add containerbase server button
- SSH access commands for the server
Monolith Next Steps - Container Setup
When your Monolith server reaches Ready status:
Step 1: Configure Security Group / Firewall
Open port 5050 to allow container communication:
For AWS:
- Go to AWS EC2 Dashboard
- Find your instance
- Click on its Security Group
- Add inbound rule:
- Protocol: TCP
- Port: 5050
- Source: Your IP or 0.0.0.0/0 (for open access)
- Save the rule
For GCP / Azure:
- Add firewall rule allowing port 5050
- Ensure traffic can reach the instance from your network
Step 2: Add Containerbase Server
- On the Ready provisioning page, click "Add containerbase server" button
- Server is registered in Nife as a container deployment target
- Monolith agent establishes connection on port 5050
- Server appears in Nife for container workload assignment
Step 3: SSH Access and Verification
Connect to your Monolith server:
ssh -i <your-ssh-key> ubuntu@<public-ip>
Example:
ssh -i nife-key.pem ubuntu@13.234.35.127
Verify Docker is Running:
# Check running containers
docker ps

# Check all containers (including stopped)
docker ps -a

# Verify Docker status
docker info

# Check Docker version
docker version
Step 4: Deploy Your First Container
Once connected, you can deploy Docker containers:
# Pull an image
docker pull nginx:latest

# Run a container
docker run -d -p 80:80 nginx:latest

# View running containers
docker ps

# View container logs
docker logs <container-id>

# Stop a container
docker stop <container-id>
Monolith Server Ready For
- Docker container deployment
- Full Docker CLI management
- Direct SSH administration
- Port 5050 connection to Nife for workload management
- Container networking and port mapping
- Persistent storage for container data
Bare VM Mode - Next Steps
When Bare VM reaches Ready:
SSH Access:
- SSH command provided:
ssh -i <key> ubuntu@<public-ip> - Full root access to instance
- Install any software needed
- Configure operating system as required
- No Nife agents running - complete freedom
Instance Appears in Dashboard
Once provisioning completes, your instance appears in the VM Management dashboard:
- Go to Virtual Machines -> VM Instances tab
- New instance appears in the table
- Shows: Name, Type, Cloud, Region, IP, Status (Ready)
- Available for management and monitoring
Common Provisioning Times
Total Time: 4-10 minutes
| Phase | Duration | What Happens |
|---|---|---|
| Provisioning | 1-2 min | VM created on cloud provider |
| Bootstrapping | 3-8 min | Agents/runtime installed and configured |
| Ready | Immediate | Fully operational, ready for use |
Factors Affecting Time:
- Cloud provider response time
- Instance size (larger instances may take slightly longer)
- Region bandwidth and network latency
- Nife system load
- Operating system being installed
Troubleshooting
Provisioning Takes Too Long
- Normal: Can take up to 15 minutes in some regions
- Check: Refresh page to see latest status
- Verify: Check cloud provider console for instance status
- Still Waiting: Cloud-init may be installing large packages
Stuck in Provisioning
- Refresh the page
- Wait another 5 minutes (network delays common)
- Check cloud provider console for actual instance status
- Delete and reprovision if stuck more than 20 minutes
Stuck in Bootstrapping
- Refresh the page
- Normal: Can take up to 8 minutes
- Check cloud provider instance logs
- Agent: May still be installing dependencies
Cannot SSH After Ready
- Verify SSH key filename and path correct
- Check public IP address displayed is accurate
- Ensure SSH port (22) is open in security group
- Wait 1-2 minutes after Ready status appears
Instance Not Appearing in Dashboard
- Refresh the VM Management dashboard
- Check you're logged into correct organization
- Wait 30 seconds and refresh again
- Verify instance status in cloud provider console
Port 5004 Not Accessible (Monolith)
- Verify security group or firewall rule created
- Check port 5004 is in inbound rules
- Ensure rule allows traffic from your IP
- Try opening port to 0.0.0.0/0 temporarily for testing
Best Practices
- Node Naming: Use descriptive, lowercase names (e.g.,
app-server-01,db-primary) - Right-Sizing: Start with medium size, scale based on actual needs
- Region Selection: Choose region closest to users
- OS Selection: Use Ubuntu 22.04 LTS for best compatibility
- Monitoring: Check performance metrics after provisioning completes
- Backups: Create snapshots after initial setup
- Cost Management: Monitor usage and delete unused instances
- Security: Update security groups to restrict access to needed ports
Checking Metrics After Provisioning
Once your VM reaches Ready status, the Nife VM Agent automatically starts and begins collecting metrics.
Viewing Provisioned Instance Metrics
Agent Metrics Dashboard
- Go to VM Management in left sidebar
- Click Agent Metrics tab
- Find your new instance in the unified dashboard
- View live CPU, Memory, Disk metrics
- Metrics auto-refresh every 30 seconds
Individual Instance Monitoring
- Go to VM Management in left sidebar
- Click VM Instances tab
- Click on your instance
- Select Monitoring from the action menu
- View detailed performance graphs
- Select time range (1h, 24h, 7d, 30d)
Typical Metrics After Provisioning
Your newly provisioned instance should show metrics like:
- CPU: 1-10 percent (low utilization at startup)
- Memory: 30-50 percent (system services running)
- Disk: less than 5 percent (OS freshly installed)
- Processes: 100-200 (base system processes)
Metrics appear within 2-3 minutes after the instance reaches Ready status.
Next Steps
- Managing VM Instances - Control and manage your instances
- Monitoring VM Performance - Monitor instance metrics and performance
- Cloud Provider Setup - Configure cloud provider accounts